Xigmatek Gaia
Just like the Xigmatek Aegir that we had for test earlier, the Xigmatek Gaia works on all recent sockets both from Intel (1366,1156,1155,775) and AMD (AM2/AM3).
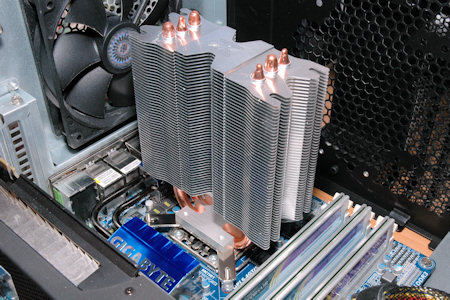
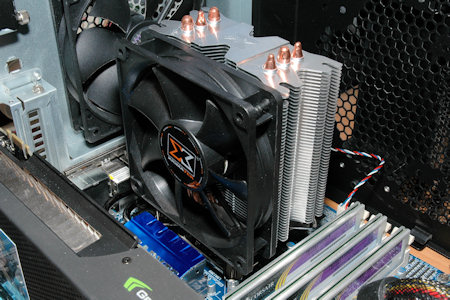
The Gaia comes in a stylish box which clearly shows the contents of the package, the CPU cooler itself bundled with an 120mm black fan. Gaia also has the direct touch heat-pipe construction but instead use the parallel approach.
Inside the package we find the fastening brackets for both the Intel and AMD sockets, a manual and warranty note as well as the CPU cooler itself together with the fan.

If we take a look at the bottom of the cooler we see a big difference compared to the Xigmatek Aegir, here we see a more flat and even base. Even though we have three heat-pipes that "break" the aluminum plate, we have less void between the aluminum and the heat-pipes. This makes it easier to apply thermal paste in a normal way, as you need to use much less of it to create an even layer.
On the sides of the cooler, as you can see on the image below, there are closed sections on the sides of the heat-sink. This is to make sure as much air as possible goes through the heat-sink and especially around the heat-pipes.
If those closed sections weren't there the air should most probably just flow out on the sides and give less cooling in the middle of the heat-sink.
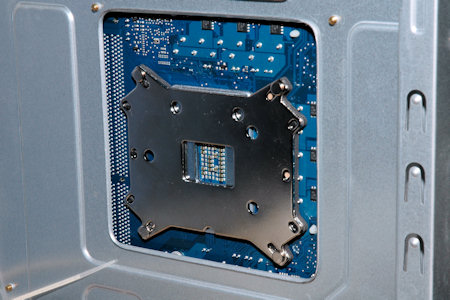
The Gaia is secured in place in a similar way to the Xigmatek Aegir with a back-plate that you fit on the backside of your motherboard. Pushing through in total four long screws that you secure in place on the top side of your motherboard with spacers. This same back-plate is used on AMD systems as well, apart from our Intel system.
For our Intel system we then place the two "arm" like metal brackets on the underside of our cooler base, secured with four smaller screws. When you then turn the cooler over you can easily place the cooler in place in any of four directions to maximize air-flow inside your case.
It also increase support for a great amount of motherboards where there may be mosfet heat-sinks in the way or perhaps you have some larger heat-sinks for your RAM modules or the like. After you have decided which direction your heat-sink should be facing the final step is to secure it with four thumbscrews. The best thing here is, there are no springs or anything that may hinder you from securing the heat-sink in the best possible way.
You just screw the thumbscrews down until you hit stop. There is no real need to screw down the screws in a X style, even though you should always work after this practice. But just to say how simple and easy the installation is, it's just that simple.
On Gaia the fan is also secured with rubber straps, just like on Xigmatek Aegir. You pull them through the holes in the fan and then stretching them around the edges on the heat-sink, securing them in place.
As always, we include the thermal conductivity list to see what kind of conductivity we're working with here. Just like with the Xigmatek Aegir, we're working with copper and aluminum. I doubt we'll ever see a full silver or gold cooler.
So with copper and aluminum we're pretty much getting the best possible cooling available. Now let's have a look on the results with Gaia to see if we could get any performance out of it.
Just as with the Xigmatek Aegir, the Gaia will be tested on our Intel Core i7 platform.
Our Intel Socket 1366 rig.
- Intel Core i7 920 Quad Processor @ 2,67GHz 8MB
- Gigabyte GA-EX58-UD5, X58
- GeForce GTX 295, 1792MB
- 6 GB Corsair XMS3 DDR3 1333MHz CL9
- 1x Western Digital WD6401AALS 650GB 7200rpm 32MB SATA2
- Windows 7 Ultimate, 64-bit
EXT means that we've used an external temperature probe, INT means we've read the values from the internal probe, that is inside the CPU itself, in this review with a program called Everest from a company called Lavalys.
Finally EXT NB means that we've taken an external probe and put it on the north-bridge on our motherboard to see the changes there. With water-cooling this changes as the natural airflow changes, however with air-cooling this shouldn't change too much depending on the CPU cooler of course. We started measuring the north-bridge chip earlier to have another reference point, so we're just continuing on the trend.
EXT temperatures are the ones that you can feel with your fingers and is therefore more easy to understand. How correct the internal probes are, I don't know, but I've included both figures just for comparison with other coolers in future reviews.
[tempstable]1[/tempstable]
[tempstable]2[/tempstable]
[tempstable]3[/tempstable]
The temperature table shows us that get quite ok results with the Gaia cooler. Higher than the Xigmatek Aegir, but still much lower that both the Intel stock cooling and the Akasa Nero.
On next page we'll take a look at my conclusion for this article.

Christopher Fredriksson


![[H]ard|OCP, https://www.hardocp.com](https://swemod.com/uploaded/affiliates/hardocp.jpg)
![[M]adshrimps, https://www.madshrimps.be](https://swemod.com/uploaded/affiliates/madshrimps.jpg)
